Need any help or advice?+44 (0)1782 454499

VIDEO TUTORIAL

Downloads (1)

Resin Plank Table Handbook2 MB

USED IN THIS PROJECT

Although not necessarily an exhaustive list, the following tools and materials, supplied by Easy Composites, were used in this project.

The quantity shown below is the approximate amount used in the project rounded up to the nearest available kit size or quantity.

MATERIALS & CONSUMABLES
Set of 6 Neon Translucent Tinting Pigments Thumbnail
PG-TR-NEON6Set of 6 Neon Translucent Tinting Pigments£9.96 /set

Nitrile Gloves Thumbnail
NG[P]Nitrile Gloves* /each

Lint Free Solvent Application Wipes 50 Wipes Thumbnail
LFW-50Lint Free Solvent Application Wipes 50 Wipes£8.45 /pack

Mirka Wet and Dry Combination Pack 50 Sheets Thumbnail
WPFCOMB-50Mirka Wet and Dry Combination Pack 50 Sheets£23.75 /pack

Polypropylene Sheet 1000 x 1000mm Thumbnail
PP-SHT-1Polypropylene Sheet 1000 x 1000mm£20.79 /sheet

Flash/Release Tape (50mm) Thumbnail
FBRT-50Flash/Release Tape (50mm)£12.46 /roll

Total £0.00
RESIN & PIGMENTS
Set of 6 Neon Translucent Tinting Pigments Thumbnail
PG-TR-NEON6Set of 6 Neon Translucent Tinting Pigments£9.96 /set

Total £0.00
TOOLS & EQUIPMENT
Safety Glasses Thumbnail
PP-SGLSafety Glasses£4.75 /each

Microfibre Polishing Cloth Pack of 10 Thumbnail
MFC-10Microfibre Polishing Cloth Pack of 10£7.95 /pack

Notched Resin Spreader Thumbnail
RS-N-2Notched Resin Spreader£1.75 /each

5L White Plastic Mixing Bucket with Lid Thumbnail
PMB-W-55L White Plastic Mixing Bucket with Lid£1.75 /each

10L Plastic Mixing Bucket with Lid Thumbnail
PMB-W-1010L Plastic Mixing Bucket with Lid£2.80 /each

10kg High Capacity Digital Scales Thumbnail
SCALE10KG10kg High Capacity Digital Scales£11.63 /each

Composites Laminating Brush 2" (50mm) Individual Thumbnail
BR-LAM-2Composites Laminating Brush 2" (50mm) Individual£1.15 /each

Total £0.00

VIDEO TUTORIAL

How to Make a Neon Resin Plank Table

Download our free eBook 'The How to Make a Resin Plank Table Handbook'

Click to download the full version of the Resin Plank Table Handbook

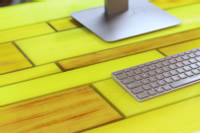
GlassCast® 3 is an epoxy coating resin from the creators of the famous original GlassCast® product used in Penny Floor projects all over the world. Glasscast 3 is perfect for projects like this Neon Resin Plank Table. It's special formulation makes it the ideal product for use with wood - like the amazing penny floors, bottle cap table tops, bar tops and many more furniture projects.

This step by step guide - consisting of the tutorial video and the free downloadable eBook will provide you with all the information you could ever need for making your own resin plank table, including planning, pouring, finishing and caring for your table. It also includes handy pointers and best-practise tips. Here are the steps in brief:


TUTORIAL BREAKDOWN

Before you begin

1. Before you begin

To start your DIY resin plank table project you will need to choose your wood, it needs to be as dry and flat as possible, if you are looking for clean crisp lines like we were then basic timber planks are ideal for this type of project, however this will depend on your personal taste. It helps if the wood is dry, flat and as straight as possible and you may need to prepare the size and lengths to give a mixture of widths and lengths in your planks. You will need to have access to a few basic tools and materials and it is very important that you work in controlled workshop conditions to achieve optimum results - a dry heated workshop and room temperature of around 20°C is ideal. It's also really important to ensure that the GlassCast® 3 is at this temperature throughout the working and curing time.

Preparing the wood

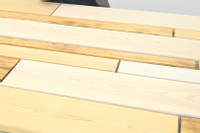
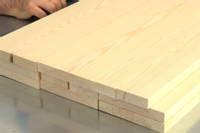
2. Preparing the wood

For this resin plank table the step by step guide assumes that the wood has been cut down into various sized planks and when laid out in a pattern creates an accurate rectangle.

Some of the planks can be made lighter or darker to add interest to the table. Some planks can be easily lightened using a water based wood dye and the some planks darkened using a blow torch gently passed over the surface of the wood to darken and bring out the grain.

Setting up the baseboard and barriers

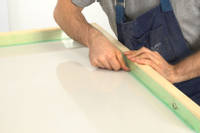
3. Setting up the baseboard and barriers

We used polypropylene sheet as the base board secured to an oversized piece of chipboard, it's important to use a material which the epoxy resin won't stick to. The polypropylene sheet will give a great surface finish and can be used many times. You will then need to add and secure the side barriers. We used timber batons and sealed them with release tape which epoxy resin also won't stick to. You can overhang the tape and fold it back to create a hinge with the tape which will allow you to seal it to the base. Then seal the corners and check the mould box is water tight.

Preparing and pouring the resin

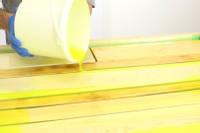
4. Preparing and pouring the resin

We recommend that you measure or weigh out the GlassCast® 3 resin for the entire project if you are adding a colour - like neon and pigment it all as a whole. This will ensure a consistent colour throughout the project. In the tutorial we added the neon yellow translucent tinting pigment - at a ratio of 50g of pigment per 15kg of GlassCast. Thoroughly mix the pigment into the resin making sure you scrape the sides and bottom of the bucket.

For this project we split the resin pours into 4 stages for the different steps in the project. For each resin stage pour out the relevant amount of pre-coloured resin and the correct amount of hardener and mix thoroughly before transferring to a second container and mixing again (this is also known as 'double-potting'). Then the following pours will be made:

  • Stage 1 - The Base Layer
  • Stage 2 - The Sealing Layer
  • Stage 3 - The Fill Layer
  • Stage 4 - The Surface Layer

After each pour the resin must be allowed to reach the B-stage - this means that the resin has partially cured and started to become firm when touching the surface (with a gloved finger) you can make a mark but no resin sticks to your finger. Pouring on top of the layer below at it's B-stage will ensure a strong chemical bond - as though the pour was done as a single pour.

If you allow the resin to cure past the B-stage you will need to key the surface with abrasive paper before pouring the next layer.

Breaking down the pours in to the 4 stages i the most important advice we can offer - it will completely seal all the faces of the wood and minimise air entrapment. When the 4th surface has been poured leave it to cure to the B-stage under cover to stop any dirt of dust coming to rest on the resin.

Finishing the surface

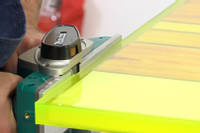
5. Finishing the surface

Once the 4th stage is fully cured, remove the barriers and using a planer remove the resin meniscus on all edges.

The surface is finished as poured, so only the sides require a little bit of work to bring them up to the same hi-gloss as the table top.

Flatting and polishing

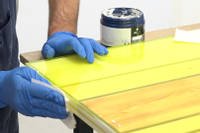
6. Flatting and polishing

Wet sand the edges starting with a 240 grit paper over a block and work through the finer grits (400, 800 and 1200) making sure that you change the water between grits and ensure that all scratches are removed before changing grits. Then using a fast cutting polishing compound, polish the edges. You will achieve a hi-gloss shine in a relatively short time.

Then fit your chosen table legs according to the manufacturers instructions.

After-care

7. After-care

Tips to care for and prolong the stunning appearance of your resin plank table include:

  • Not placing hot objects directly onto the surface, make sure you use heat proof mats.
  • GlassCast® 3 has been designed to have the best UV stability of any epoxy resin on the market and will withstand years of indirect sunlight, but should be kept away from direct exposure to UV light.
  • Repairing scratches and marks - by repeating the finishing and polishing steps it is possible to restore the surface to a high-gloss finish if it is damaged.

If you are interested in learning more about the product and alternative ideas go the GlassCast® 3 product page.


DISCUSSION (7)

Please share any questions or comments you may have about this video tutorial.


Andy Flemming
How resistant is the resin to scratches?
Easy CompositesMatt
The GlassCast range of epoxies are very scratch resistant and hard wearing however, dragging something sharp or heavy across the surface could cause some marks.

Andy Flemming
Could it be honed to give it a matt finish?
Easy CompositesMatt
Yes of course, there are a few ways of getting a matt finish you could go through sanding the entire surface, starting at around a 120 grit and gradually working your way up to around a 3000grit. This will give a very matt finish on the resin and will appear translucent. Another way of achieving this would be to apply a matt lacquer over the surface of the cured resin to get the desired effect.

Viola Froidevaux
How did you seal the planks? with resin too?
Easy CompositesMatt
Yes, the 2nd resin pour was enough to sit the planks on top of and seal all of the planks - we found the best way to do this was by brushing over the tops, edges and ends. It was then left to cure to the B-stage before moving on to the 3rd stage pour.

MrSpike2450
What do you use for cleaning the mixing buckets?
Easy CompositesMatt
Acetone or Methylated Spirits are good for cleaning down. Depending on the type of plastic that the bucket is made from, you may find that after the resin has cured, you can simply flex the sides and the resin will crack off the sides.

Frasr Lindsay
How long does the resin take to cure to its 'B-stage'?
Easy CompositesMatt
GlassCast 3 it will take around 8-12 hours in a room that is a consistent 20°C to reach its B-stage.

Rakesh Patil
Why you have multiplied the volume (3.84) by 0.666? Sorry but I don't understand the calculation?
Easy CompositesMatt
The reason this is multiplied is to work out how much resin is needed for the pour. the same will be for the hardener 3.84 x 0.333. The reason we use the 0.666 and 0.333 is because the mix ratio for the GlassCast 3 is 2:1 by weight and that is how it is being measured in this tutorial.

Andy Flemming
I plan to apply the resin with my hob and sink still in situ, what do you advise about masking them up so they can be removed at a later date if needed, i.e. resin sticking to them?
Easy CompositesMatt
The best thing to do in this situation would probably be to remove the hob and sink before pouring the GlassCast onto the surface to prevent the resin from bonding to them. Once the resin has been poured on the worktop, you will need to wait for this to reach its full cure which can take a few days in a room that is a consistent 20°C before reconnecting the hob or sink.

LEAVE A COMMENT OR QUESTION

Note: Your name will be abbreviated and your email address will only be used to email you the answer directly

Downloads (1)

Resin Plank Table Handbook2 MB

USED IN THIS PROJECT

Although not necessarily an exhaustive list, the following tools and materials, supplied by Easy Composites, were used in this project.

The quantity shown below is the approximate amount used in the project rounded up to the nearest available kit size or quantity.

MATERIALS & CONSUMABLES
Set of 6 Neon Translucent Tinting Pigments Thumbnail
PG-TR-NEON6Set of 6 Neon Translucent Tinting Pigments£9.96 /set

Nitrile Gloves Thumbnail
NG[P]Nitrile Gloves* /each

Lint Free Solvent Application Wipes 50 Wipes Thumbnail
LFW-50Lint Free Solvent Application Wipes 50 Wipes£8.45 /pack

Mirka Wet and Dry Combination Pack 50 Sheets Thumbnail
WPFCOMB-50Mirka Wet and Dry Combination Pack 50 Sheets£23.75 /pack

Polypropylene Sheet 1000 x 1000mm Thumbnail
PP-SHT-1Polypropylene Sheet 1000 x 1000mm£20.79 /sheet

Flash/Release Tape (50mm) Thumbnail
FBRT-50Flash/Release Tape (50mm)£12.46 /roll

Total £0.00
RESIN & PIGMENTS
Set of 6 Neon Translucent Tinting Pigments Thumbnail
PG-TR-NEON6Set of 6 Neon Translucent Tinting Pigments£9.96 /set

Total £0.00
TOOLS & EQUIPMENT
Safety Glasses Thumbnail
PP-SGLSafety Glasses£4.75 /each

Microfibre Polishing Cloth Pack of 10 Thumbnail
MFC-10Microfibre Polishing Cloth Pack of 10£7.95 /pack

Notched Resin Spreader Thumbnail
RS-N-2Notched Resin Spreader£1.75 /each

5L White Plastic Mixing Bucket with Lid Thumbnail
PMB-W-55L White Plastic Mixing Bucket with Lid£1.75 /each

10L Plastic Mixing Bucket with Lid Thumbnail
PMB-W-1010L Plastic Mixing Bucket with Lid£2.80 /each

10kg High Capacity Digital Scales Thumbnail
SCALE10KG10kg High Capacity Digital Scales£11.63 /each

Composites Laminating Brush 2" (50mm) Individual Thumbnail
BR-LAM-2Composites Laminating Brush 2" (50mm) Individual£1.15 /each

Total £0.00

DISCUSSION (7)

Please share any questions or comments you may have about this video tutorial.


Andy Flemming
How resistant is the resin to scratches?
Easy CompositesMatt
The GlassCast range of epoxies are very scratch resistant and hard wearing however, dragging something sharp or heavy across the surface could cause some marks.

Andy Flemming
Could it be honed to give it a matt finish?
Easy CompositesMatt
Yes of course, there are a few ways of getting a matt finish you could go through sanding the entire surface, starting at around a 120 grit and gradually working your way up to around a 3000grit. This will give a very matt finish on the resin and will appear translucent. Another way of achieving this would be to apply a matt lacquer over the surface of the cured resin to get the desired effect.

Viola Froidevaux
How did you seal the planks? with resin too?
Easy CompositesMatt
Yes, the 2nd resin pour was enough to sit the planks on top of and seal all of the planks - we found the best way to do this was by brushing over the tops, edges and ends. It was then left to cure to the B-stage before moving on to the 3rd stage pour.

MrSpike2450
What do you use for cleaning the mixing buckets?
Easy CompositesMatt
Acetone or Methylated Spirits are good for cleaning down. Depending on the type of plastic that the bucket is made from, you may find that after the resin has cured, you can simply flex the sides and the resin will crack off the sides.

Frasr Lindsay
How long does the resin take to cure to its 'B-stage'?
Easy CompositesMatt
GlassCast 3 it will take around 8-12 hours in a room that is a consistent 20°C to reach its B-stage.

Rakesh Patil
Why you have multiplied the volume (3.84) by 0.666? Sorry but I don't understand the calculation?
Easy CompositesMatt
The reason this is multiplied is to work out how much resin is needed for the pour. the same will be for the hardener 3.84 x 0.333. The reason we use the 0.666 and 0.333 is because the mix ratio for the GlassCast 3 is 2:1 by weight and that is how it is being measured in this tutorial.

Andy Flemming
I plan to apply the resin with my hob and sink still in situ, what do you advise about masking them up so they can be removed at a later date if needed, i.e. resin sticking to them?
Easy CompositesMatt
The best thing to do in this situation would probably be to remove the hob and sink before pouring the GlassCast onto the surface to prevent the resin from bonding to them. Once the resin has been poured on the worktop, you will need to wait for this to reach its full cure which can take a few days in a room that is a consistent 20°C before reconnecting the hob or sink.

LEAVE A COMMENT OR QUESTION

Note: Your name will be abbreviated and your email address will only be used to email you the answer directly

100% SECURE

    Secured by Digicert Payments by Adyen

PAYMENT METHODS

    Mastercard logo Visa logo Maestro logo PayPal logo Bank Transfer logo
    Staffordshire Chambers of Commerce member Composites UK member

Easy Composites Ltd, registered in England 7486797. All content copyright (C) Easy Composites Ltd, 2024. All rights reserved.