Need any help or advice?![]() +44 (0)1782 454499
+44 (0)1782 454499
VIDEOS IN THIS SERIES
This video is part 2 of a 3 part series: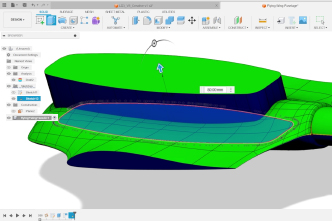
USED IN THIS PROJECT
Although not necessarily an exhaustive list, the following tools and materials, supplied by Easy Composites, were used in this project.
The quantity shown below is the approximate amount used in the project rounded up to the nearest available kit size or quantity.
PATTERN MAKING MATERIALS

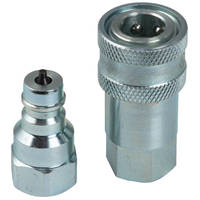
SPLIT MOULD CLAMPING BUSHES

VACUUM BAGGING CONSUMABLES
TOOLS & EQUIPMENT


MATERIALS & CONSUMABLES


MOULD MAKING MATERIALS
VIDEO TUTORIAL
Making Precision Split-Moulds using Tooling Prepreg & Mould Bushes
In this video, we will demonstrate how to make precision split-moulds using tooling prepreg. This process is widely used in advanced composites to produce precision, multi-part moulds for complex carbon fibre parts, such as the drone fuselage featured in the tutorial.
A critical aspect of creating accurate split-moulds is the use of mould clamping bushes, which is the main focus of this tutorial. The video covers pattern preparation, how to position and align mould clamping bushes, how to laminate them in and - after laminating and an initial post cure - how to extract the dowel pins, finish the mould and postcure it.
WHAT YOU WILL LEARN
Introduction
Over the course of this 13 minute tutorial, you will learn:
- How mould bushes are used to align and secure sections of multi-part moulds
- How removable barriers on the pattern can easily create 90° returns on moulds
- How to use alignment pins to accurately position the mould bushes
- How to laminate mould bushes into the mould
- Considerations when vacuum bagging over bushes and pins
- How to grind the bushes ready for use
The tutorial also includes an overview of CNC machining the epoxy patterns, laminating and curing XPREG® XT135 tooling prepreg, and finishing the moulds with S120 board sealer, all of which are also covered in more detail in other tutorials.
TUTORIAL BREAKDOWN
1. Introduction to Patterns
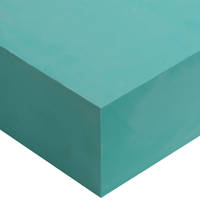
The Patterns are used to take the mould from. As these moulds are for pre-preg use, the patterns also need to be able to withstand the temperature of the initial cure of the Tooling Pre-preg. Typically this requires the use of Epoxy Tooling Block.
In this case, this is blocked out using our EB700 Epoxy Tooling block. The board is then CNC routed on a 3 axis router, machining marks sanded off by hand and the board finished with S120 board sealer to give the final finished patterns.
Due to the nature of the pattern needing to survive the pre-preg cure, almost always the flanges and clamping bush surfaces will be machined into the tooling board pattern as other materials will unlikely withstand the moulding process. For more information on how to design these features in CAD, we do have a detailed video that explains the process here: Practical CAD Techniques for Composite Pattern/Mould Design
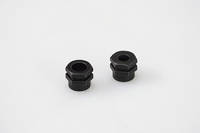
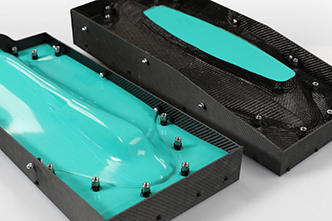
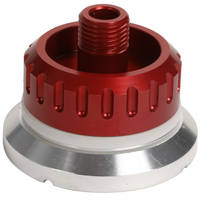
2. Split Mould Clamping Bushes
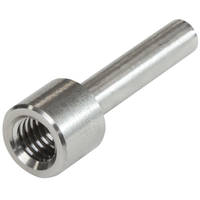
For complex split moulds like this, it is important to be able to align the moulds accurately. This is the purpose of the Clamping Bushes. In theory, you could drill through the moulds and just use a nut and bolt, however, these holes would quickly wear leading to alignment issues with the mould.
The mould clamping bushes take care of this problem. They are locally made here in Stoke on Trent and are precision machined, case hardened and feature a grooved hexagonal head to securely lock them into the laminate. They are available in an M6 and M8 fitting, paired with a dowel for alignment during the moulding process.
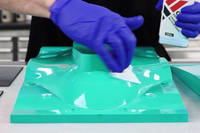
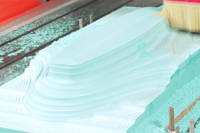
3. Applying Release Agent
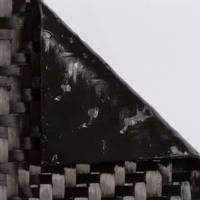
The nature of the mould we want to produce means that we will need shuttering. This has been cut from 3mm carbon sheet by CNC, however, it could easily be cut by hand and from any material that can handle the cure temperature. A release agent is essential to ensure the finished mould can be removed from the pattern. Thus the pattern, shuttering and dowel pins will all need to be coated. It is recommended to release coat prior to assembly to ensure that any resin that bleeds between the sections does not cause them to be bonded together.
The CR1 EasyLease Chemical Release Agent is applied in 6 layers to the pattern, shuttering and dowel pins. Once the release agent has fully dried, the shuttering can be assembled by drilling and tapping M4 holes into the pattern and screwing together using M4 bolts. The bushes are then slid over the dowel pins and pressed into place at all the bush locations on the patterns. Some additional bushes are being fitted to the shuttering to allow a flat plate to be fitted to the mould to form the wing roots. There is not enough thickness to use a dowel pin, so the bushes are being held in place with a nut and bolt.
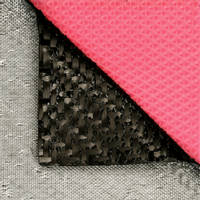
4. Laminating the Surface Ply
Now that the patterns are ready for use, it is time to laminate the tooling pre-preg. These principles with the pattern and bushes could equally be applied to hand lay up mould making methods but, with this mould being intended for pre-preg production, realistically a tooling pre-preg is likely to be used. In this case, the XT135 Tooling Pre-preg system is going to be used. This video is not intended as a full guide to the XT135 system, so the details will be covered reasonably quickly. For a detailed video on how to use the XT135 System then you can watch our guide on How to Make Prepreg Carbon Fibre Moulds Using Tooling Prepreg or download the Processing Guide.
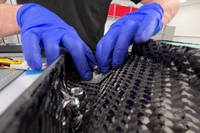
Firstly, strips are cut from the surface ply at a 45 degree angle and then placed into the tight corners. This is done to help with getting the fibres into the tight 90 degree angles. By laying up at a 45 degree angle, the individual fibres are only going to have to go through a 45 degree change of angle which makes it easier to conform to the corner and means it is less likely you will have voids or bridging issues in this area. A heat gun can be used to warm the pattern surface and soften the pre-preg slightly to help improve the tack and grip onto the pattern.
The next stage is to laminate around the bushes by cutting small patches of material. A wad punch is a great tool to cut the holes in the patch. The patch is then applied over the bush onto the pattern. The sides of the bushes are then laminated over with some of the 45 degree cut strip before the rest of the surface ply is laminated as normal. This is then repeated for the second pattern, before doing a debulk. This is done by applying a layer of perforated release film, breather and then vacuum bagging the patterns under full vacuum for a minimum of 20 minutes. This helps ensure the surface ply has good consolidation against the mould. Once the debulk is complete, the patterns can be removed from the bag and we can move onto laminating the backing plies.
5. Backing Plies & Initial Cure
The backing plies are laminated in a similar way to the surface layer, but being a thicker laminate, they do take a bit more effort to cut an lay up. For small moulds like this, we will being going for a 1-2-1 lay up, which means one layer of surface, 2 layers of backing ply and a final layer of surface ply to give a balanced lay up. For larger moulds, a 1-4-1 layup would be more typical. For optimal balance on the moulds, it is good practice to flip the backing ply upside down at the mid plane and carry on with the resin rich side facing up. However, for this small and highly contoured mould, we have chosen not to do this as this would have negligible effect on the dimensional accuracy and saves time.
Now that the backing plies are laid up, the moulds can be cured. First a perforated release film is applied, then the breather layer, before vacuum bagging them. Slowly pull a full vacuum, taking care to adjust the bagging film to avoid any bridging. Take extra care to have excess bagging film around the pins so that as the vacuum is pulled, the chances of puncturing the bag is minimised. Then conduct a full leak test to ensure the bags are sealed and ready for the cure.
The cure is conducted in our OV301 Composites Curing Oven using the standard initial cure cycle for the XT135 Tooling Pre-preg system. This is done at 65C for several hours and this is what differs compared to other pre-preg systems.
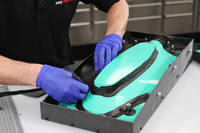
6. Demould & Trim
Once the cure cycle has been completed, the moulds can be removed from the oven and the vacuum bagging materials removed. It is now time to extract the dowel pins - the head of the pins have an M8 thread in them. This allows the use of a slide hammer to allow extraction of the pins. An alternative option is the use of a T handle, which can be threaded onto the pin and a lock nut tightened. A twisting and pulling action can be used to extract the pins.
A slide hammer or T handle are the ideal tools but, if needed, the pins can be removed using a bolt. This needs a locking nut to secure, screwing the bolt into the pin until it bottoms out, then winding back half a turn, before using the locking nut to secure it. The bolt can then be unwound by hand with a twisting and pulling action. It is also possible to use a cordless drill for the extraction but keep the drill speed low to prevent excessive heating of the dowel pin, which may damage the surrounding mould laminate.
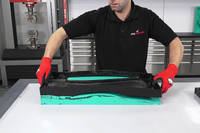
Once all the pins have been removed, there is little holding the moulds in place and they can be easily demoulded from the pattern. Then it is a case of removing the flashing, trimming the flanges and then the material around the top of the bushes is ground flat. This is necessary to give a flat surface for the bolt to seat on and also to remove any flashing or sharp edges that could burst a vacuum bag during the moulds use.

7. Post Cure
Now that the moulds have been demoulded from the patterns, the next stage is to conduct a post cure. This is an elevated temperature post cure which goes up to the maximum service temperature of the moulds and ensures they are fully cured and ready for elevated temperature use. This is done off the patterns to eliminate any issues related to thermal expansion. Also, being split moulds, they will be clamped together during the post cure to ensure perfect alignment between the mould halves.
Whenever you are doing a post cure of a split mould with the tooling pre-preg (or any other tooling system in most cases), it is important to apply release agent to all the contact areas of the mould flanges. This is because on untreated surfaces, the temperature increase of the post cure may potentially soften the resin slightly meaning untreated flanges may stick slightly to each other. Once the release agent has been applied, the mould sections can be clamped together with the nuts and bolts.
Once clamped together, the mould is placed in the OV301 Composites curing oven and the standard post cure cycle for the XT135 Tooling System is carried out. This involves a very slow ramp rate up to the maximum service temperature to avoid any distortion. This can be easily programmed and selected via the OV301's Touch Screen Controller. Once the post cure is complete, the mould sections can be removed from the oven.
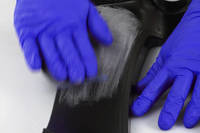
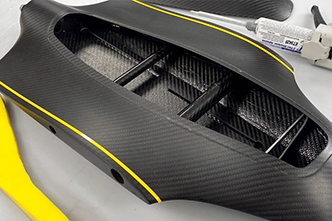
8. Flat & Seal
After the post cure, you may find you have a small amount of surface print through caused by the elevated temperature of the post cure. To remove it, it can be simply sanded flat with an 800 or 1200 grit sandpaper and then the surface can have one or two coats of the S120 applied to restore the gloss finish.
Adding the side plates, machined from carbon fibre sheet, the complete set of moulds is now complete. By using the Tooling pre-preg and the clamping bushes, we have achieved a high quality and accurate mould that can now be used to make a batch of parts.
USED IN THIS PROJECT
Although not necessarily an exhaustive list, the following tools and materials, supplied by Easy Composites, were used in this project.
The quantity shown below is the approximate amount used in the project rounded up to the nearest available kit size or quantity.
PATTERN MAKING MATERIALS
SPLIT MOULD CLAMPING BUSHES
VACUUM BAGGING CONSUMABLES
TOOLS & EQUIPMENT
MATERIALS & CONSUMABLES
MOULD MAKING MATERIALS
100% SECURE
PAYMENT METHODS


Easy Composites Ltd, registered in England 7486797. All content copyright (C) Easy Composites Ltd, 2025. All rights reserved.